Selfhosted, private home automation with Zigbee2MQTT, Mosquitto and Home Assistant
This page serves as an introductory howto on home automation using Zigbee2MQTT, Mosquitto and Home Assistant with the help of Docker and Docker-Compose, with the goal of being independent from the cloud and IoT companies (read: all-local communication!).
While I started with Wifi-connected IoT devices (smart lights and smart plugs), I became increasingly concerned for those reasons:
1) Wifi-connected IoT devices are apparently more demanding in electrical consumption than their Zigbee counterparts. I became concerned when my monthly electricity bill crossed the 200$ CAD mark! :) (Sidenote: Since then, I replaced my home server from a power hungry full-fledged PC with a ZFS array of 4 SATA Disks to a decommissionned laptop with two SSDs (Yes, I removed the laptop battery. Yes, my backups are up to date. Why do you ask? 😄 ))
2) Those Wifi IoT devices has full access to my LAN, so I became concerned since they work like a black box, with no way to control their behaviour other than with their official app that uses THEIR cloud infrastructure. If you’re lucky, you may get Home Assistant integration, but that relies on using the vendor’s IoT infrastructure. My TP-Link Smart Plugs are REALLY slow to act (read: 10s of seconds at BEST) when I use the official channels. Anyway, I assume those devices works “in good will”, but since I don’t have access to the hardware or firmware, I can only hope they’re not doing any sniffing or poking around! (More reading on this subject)
So for this reason, I switched over to Zigbee devices. While Zigbee and Z-Wave operates on its own wireless network, independent from regular Wi-fi, a hardware hub is “USUALLY” required to control the equipment, and that still uses the hub’s cloud infrastructure to manage the devices. Back to the point #2 above.
However, I realized that I can use a Zigbee USB Antenna (like this Sonoff ZBDongle-P) for example, plug that into Home Assistant, and do the device management completely internally. This means that by using Home Assistant and a dedicated Zigbee antenna, I am not dependent on someone else’s cloud to manage devices in the home– all the communication using this setup happens in-house. My internet connexion could even drop and all my Zigbee-powered devices would still function properly and even be controlled without interruption.
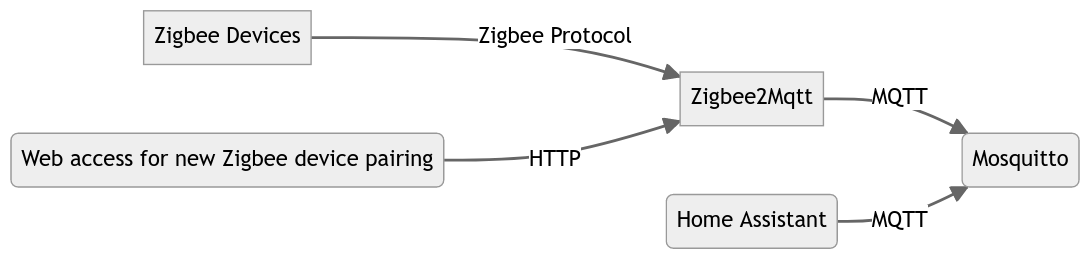
Here is a diagram of all the different services being used in my smart home setup. Note that there are also alternative setups on the web that uses use Home Assistant only (this means that the USB Dongle above is directly managed, along with the paired devices, directly by Home Assistant and not by any third-party services like in my setup); however I’ve been told that this is less versatile in terms of device compatibility and possibly less stable as well. So for this reason, I went ahead and deployed all the services I needed in different Docker containers. All three containers are pretty much plug-and-play (“set them and forget them”) anyway.
In the following sections, I am describing how all services are set up. To be able to follow this guide, familiarity with Docker and Docker-Compose is required.
network_mode: host in docker-compose sample codeThis option was enabled for all services in my setup, but you may not need it in your situation. I am using a dedicated machine for my IoT management (meaning that Home Assistant, Zigbee2MQTT and Mosquitto all runs on the same dedicated machine), so I didn't mind having the TCP ports of these services exposed on my LAN. A suggested best practice: only have the Home Assistant web portal accessible within the LAN, and leave both Zigbee2MQTT and Mosquitto unexposed from the host, but instead sharing an internal Docker network. You may need to fiddle around Docker-Compose networks to achieve this, but i'll leave this complexity out of this blog post for easyness' sake.
Configuring Zigbee2MQTT
Zigbee2MQTT is responsible of communicating and pairing with Zigbee devices, and translate their interactions into MQTT messages. There is also a small web interface to manage Zigbee devices and enable pairing mode; I suggest enabling the pairing mode on a per-need basis in the web interface, and leaving the configuration to permit_join: false. This won’t disable pairing, but it will start in a disabled state until you turn it on.
Here are the installation instructions for docker-compose. You can also follow my bit of configuration for Zigbee2MQTT (shortened):
version: '3'
services:
  zigbee2mqtt:
    container_name: zigbee2mqtt
    image: koenkk/zigbee2mqtt
    restart: unless-stopped
    volumes:
      - /srv/docker/zigbee2mqtt:/app/data  # change to fit your needs
      - /run/udev:/run/udev:ro
    environment:
      - TZ=Americas/Toronto
    # rootless execution -- see note below
    group_add:
      - dialout
    user: 1000:1000
    network_mode: host
      # this likns the Zigbee USB Dongle to the container - REQUIRED:
    devices:
      - /dev/serial/by-id/usb-Silicon_Labs_Sonoff_Zigbee_3.0_USB_Dongle_Plus_0001-if00-port0:/dev/ttyACM0 # change only the left part
Notes:
- Zigbee2MQTT data resides in
/app/datain the container. I have it mounted on my host as/srv/docker/zigbee2mqttto store permanently the app settings. - Note the devices section – you WILL need to customize it for your needs. A Zigbee USB dongle IS required to successfully launch Zigbee2MQTT. On the host running Docker and hosting the USB Dongle, look for a symlink in
/dev/serial/by-id/that points to your USB Dongle. You need to adjust the left part of the association in thedevicessection in the docker-compose config above, and/dev/ttyACM0needs to be unchanged so Zigbee2MQTT, which is hard-coded to look for that device by default, can use your USB Dongle. - “Rootless execution” as per the documentation didn’t seem to work for me. The issue seems to revolve around access rights for my USB Dongle. Documentation suggests that you should add the user running the container (here, User ID 1000) to the UNIX group “dialout” or whatever group that your USB Dongle actually has on your filesystem (follow the symlink you found above to find out). In my case, the issue persisted even after adding the running user to the dialout group. My workaround was to change the user/group of the USB Dongle to 1000:1000, just like in the Docker-compose config above. I did so by creating this udev rule file in
/etc/udev/rules.d/: (name it however you like; I suggest prepending it with a double-digit as it is the standard for UDev Rules):
KERNEL=="ttyUSB0", OWNER="1000", GROUP="1000"
- After creating the udev rule file, typing
udevadm control --reload-rulesis required so that udev loads the newly created file.
App Conifiguration
The documentation mentions to use a configuration.yaml file, here are parts of my starter configuration I used, based on their boilerplate config (see the comments where I mentioned “CHANGED” or “ADDED”):
# Home Assistant integration (MQTT discovery)
# CHANGED to true
homeassistant: true

# allow new devices to join
# CHANGED to false; This is overridden in the UI temporarily by you, when pairing.
permit_join: false

# MQTT settings
mqtt:
  # MQTT base topic for zigbee2mqtt MQTT messages
  base_topic: zigbee2mqtt
  # MQTT server URL
  # CHANGED, as see fit for your needs
  server: 'mqtt://192.168.123.33'
  # MQTT server authentication
  # CHANGED, this user is configured in Mosquitto later
  user: homeassistant
  password: hunter2 # if you know the reference, you are awesome!

# Serial settings
serial:
  # Location of CC2531 USB sniffer
  # needs to match the right part in the docker-compose devices section
  port: /dev/ttyACM0

# ADDED: web access configuration
frontend:
  port: 8080
  # Optional, default 0.0.0.0
  host: 0.0.0.0
  # Optional, enables authentication, disabled by default
  auth_token: hunter2

# ADDED: advanced section for  Zigbee Network config: https://www.zigbee2mqtt.io/guide/configuration/zigbee-network.html#network-config
# listed here are the defaults that I recommend you to change or look up for
advanced:
  # Optional: ZigBee channel, changing requires re-pairing of all devices. (Note: use a ZLL channel: 11, 15, 20, or 25 to avoid Problems)
  # (default: 11)
  channel: 11
  # Optional: network encryption key, will improve security
  # Note: changing requires repairing of all devices (default: shown below)
  network_key: [ 1, 3, 5, 7, 9, 11, 13, 15, 0, 2, 4, 6, 8, 10, 12, 13 ]
Do NOT use 'hunter2' as your password. This is an Internet meme, and as such is considered insecure.
Configuring Mosquitto
Mosquitto (2 t’s) is a lightweight MQTT implementation that Home Assistant uses to query the Zigbee network (or actually, what Zigbee2MQTT above has in it’s inventory). Home Assistant prefers Mosquitto over ActiveMQ or RabbitMQ, according to the documentation.
Docker-compose configuration:
version: '3'
services:
  mosquitto:
    image: eclipse-mosquitto
    container_name: mosquitto
    restart: unless-stopped
    network_mode: host
    volumes:
      - /srv/docker/mosquitto:/mosquitto # change to fit your needs
- Mosquitto data resides in
/mosquittoin the container. I have it mounted on my host as/srv/docker/mosquittoto store permanently the app settings. - If I remember correctly, folders
data,logandconfigmust be present in your mounted volume; if not, Mosquitto will complain and exit. - Configuration is rather straightforward. In
mosquitto/config/mosquitto.conf:
persistence true
persistence_location /mosquitto/data

bind_address 0.0.0.0

log_dest file /mosquitto/log/mosquitto.log
# for debugging purposes:
#log_type all

allow_anonymous false
password_file /mosquitto/config/password.txt
The line password_file points to a file that has your user/password that is both being used by Zigbee2MQTT above in the mqtt section of it’s config, and by Home Assistant later. Mosquitto provides a tool to generate this password file - see the official documentation for more information. In our setup, we’ll need to:
- Disable/Comment out the
password_fileline for first startup without a password file. (You need to put a#in front) - Once mosquitto is launched by docker-compose, type
docker exec -it mosquitto mosquitto_passwd -c /mosquitto/config/password.txt homeassistant, wheremosquittois the name of the mosquitto Docker container, andhomeassistantis the username you want to create a password for. This needs to match the Zigbee2MQTT config lineuser: homeassistantabove.- Careful: Typing the command
mosquitto_passwd -ccreates a new file, and will OVERWRITE any existing file. You may want to executemosquitto_passwdwithout-cto append a second MQTT account. See the docs linked above for more infos.
- Careful: Typing the command
- Once a valid
password.txthas been created, uncomment thepassword_fileline inmosquitto.confso it’s now being used next time mosquitto is restarted. (And of course, restart it.)
Configuring Home Assistant
Home Assistant can easily be a topic on its own. There are a ton of Youtube videos showing how to install or configure Home Assistant to have a good working state, so I will skip that part. However, I will mention that I chose the “container method” mentioned in their installation instructions. This gives me a “good enough” working state, in the sense that a major drawback of this installation type is that Supervisor and Addons aren’t supported by this installation method, however I don’t use them. On the upside, since this is a simple Docker container, so I can easily backup the configuration and data like any other container. Their documentation on docker-compose is rather straigtforward, but i’ll provide you my docker-compose configuration as well for completeness’ sake:
version: '3'
services:
  homeassistant:
    container_name: homeassistant
    image: "ghcr.io/home-assistant/home-assistant:stable"
    volumes:
      - /srv/docker/homeassistant:/config # change to fit your needs
      - /etc/localtime:/etc/localtime:ro
    restart: unless-stopped
    privileged: true
    network_mode: host
Sidenote: there is a paragraph on Zigbee in their installation documentation, just next to the docker-compose config section. We actually don’t need to do that here, as we shared the USB Device via Zigbee2MQTT earlier. This section is for setting up running Zigbee natively on Home Assistant, which I don’t use.
Additional notes and setup instructions:
- Once you started the container, you may need to access your Home Assistant instance’s webpage to set up the first user. It should be using port 8123, by default. Home Assistant should be reachable via
http://<IP of your Docker host>:8123. Don’t forget the firewall: by default, Rocky Linux and Almalinux has the firewall activated, so adjusting the firewalld rules might be necessary. - Once the first-time setup has been completed and the dashboard is accessible, go into Settings » Devices & Services » Integration » “+ Add Integration” in the lower right. In the list of integrations, look for the brand MQTT, and when asked what you want to add, select simply MQTT again. You will need to specify the IP address of the MQTT server (most probably 127.0.0.1 if hosted on the same machine, or the Docker container name if hosted in it’s own internal Docker network), as well as the username and password as configured in the Mosquitto container above. Here is an example:

Once Home Assistant is connected to Mosquitto (in the Settings » Devices & Services » Integration window, a card named “MQTT” along with the server hostname or IP, the number of devices and entities should be displayed), it’s showtime! You are now ready to add devices.
Pairing devices
Pairing devices can be done on the web interface of Zigbee2MQTT. The web interface is only activated if a frontend section is explicitly included in the configuration.yaml file, as I did above. By default, enabling the frontend will use port 8080, so the Zigbee2MQTT frontend is avalible via http://<IP of your Docker host>:8080
On the web interface, clicking on “Permit join (All)”, as highlighted below, will activate pairing mode. This is to be activated when setting up new Zigbee devices that you want to add to your smart home.
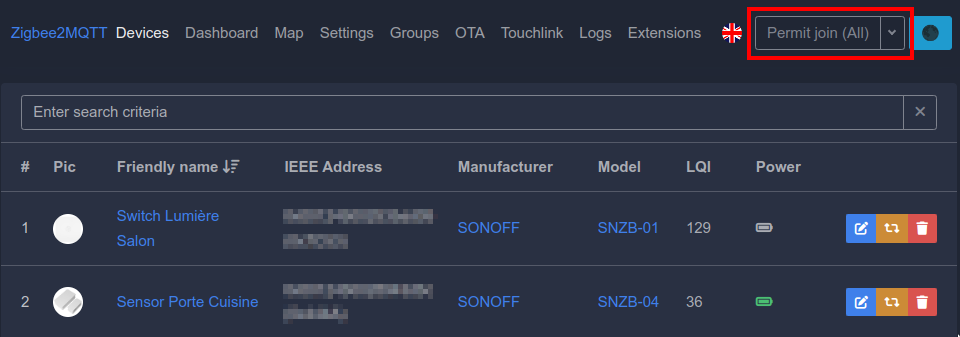
Once paired, devices can be renamed by clicking on the blue button on the line of the device. However, the name seems to be local to Zigbee2MQTT only. Since most of the device’s management is done on the Home Assistant side anyway, i’d suggest keeping a clean inventory in Home Assistant’s side, but having a clean list in Zigbee2MQTT doesn’t hurt neither. New devices should be immediately appearing in Home Assistant as soon as ther are paired in Zigbee2MQTT. You can view the devices in Home Assistant in Settings » Devices & Services » Intregrations » MQTT and click onthe links under MQTT that shows the number of devices and entities; this will list all devices or entities coming from MQTT only, ignoring all other sources of devices or entities.
Conclusion and thoughts
By following the Docker volume path pattern shown in the examples above, having a complete backup of all data and configuration from the Docker containers is simply a matter of taking a full backup of /srv. Although this is not explicitely shown in the examples above, but to be clear and to have backups that are as complete as possible, I also put my docker-compose.yaml file (that is a combination of all services shown above) inside /srv. Restoring services is simply a matter of copying back all the data structure inside /srv, install Docker-CE and docker-compose on the host OS and typing the command docker-compose up -d once wherever docker-compose.yml resides.
Using /srv is a personal standard of mine (that you don’t need to actually follow, you’re free to do whatever you want), which is inspired by the Linux Foundation FHS, that states this use for /srv according to Wikipedia:
Site-specific data served by this system, such as data and scripts for web servers, data offered by FTP servers, and repositories for version control systems
Furthermore, the Linux Documentation Project states:
/srv contains site-specific data which is served by this system. (…) The methodology used to name subdirectories of /srv is unspecified as there is currently no consensus on how this should be done. One method for structuring data under /srv is by protocol, eg. ftp, rsync, www, and cvs.
…which I very loosely follow. What I like to do is to have all Docker containers volumes mounted under /srv/docker/CONTAINER, one (or many, if more than one volume are needed by the Docker service. In this case I create subdirectories, one per volume.) for every Docker service I configure on this host. I also inclued one main docker-compose file that declares every services I want to bring up at /srv/docker/docker-compose.yaml. Any non-Docker services are stored next to the Docker directory. For example, /srv/syncthing for Syncthing shares.