Privately publish selfhosted services on a public web server
This blog post title seems to be an oxymoron at first glance. “Publish” means “Prepare and issue for public (…) distribution or readership“. Private means “for the use of one particular person or group of people only”. And that’s exactly what I want to do: I want to publish a self-hosted web service on the public web, but for my own needs only. By that, I mean that I want to publish a web service on a given URL, but block it from wide open public access. A sane individual would say: just put it in a VPN, so it’s in no way accessible from the public internet, but where’s the fun of it? 😄
Sure, I really do have a VPN for some services that don’t belong on the Internet (Think SSH, file transfer, etc). But what about xBrowserSync, or Bitwarden? Having that completely accessible on the Internet is a gamble I don’t want to risk: you’re at the mercy from the software developer and container publisher, and I certainly don’t want data leaks.
So I managed to achive a middle ground of actually having web services accessible from the public internet on a public URL, whitelisting certain IPs and keeping it blocked altogether from the rest of the world. I can even open up access on a per-IP basis by logging in from a specific URL (Although warning: it’s considered security by obscurity and is a Bad Thing™) for temporary remote access.
Skills required to follow: Many skills needed! You need to know how to manage a Docker host with containers running, configure a web server to use these Docker container, configure a reverse proxy web server, and a bit of NodeJS programming and Bash scripting for the extra step.
Skill level required: Pretty close to Devops?
For the impatient: TLDR summary
I personally dislike the new trend with blog posts on a technical subject beating around the bush, explaining what is a Docker, what are ports, when did Apache release httpd v1.3 and explaining the whole universe from the big bang up to nowadays before getting to the real meat of the subject. So if you are in a hurry or want to read fast, here is the gist of the tactic I used to blocking public access to my web services. Skip to the next section of this article if you are ready to get the details of every script, service or config. Also, you’re welcome!
I created a little graph to help visualize the whole process. There are two entry points in this graph, one for the service you want to protect, in green (I used Nextcloud as an example), and the other as your way to allow yourself external access when you are NOT in the allowed IP list, in yellow.
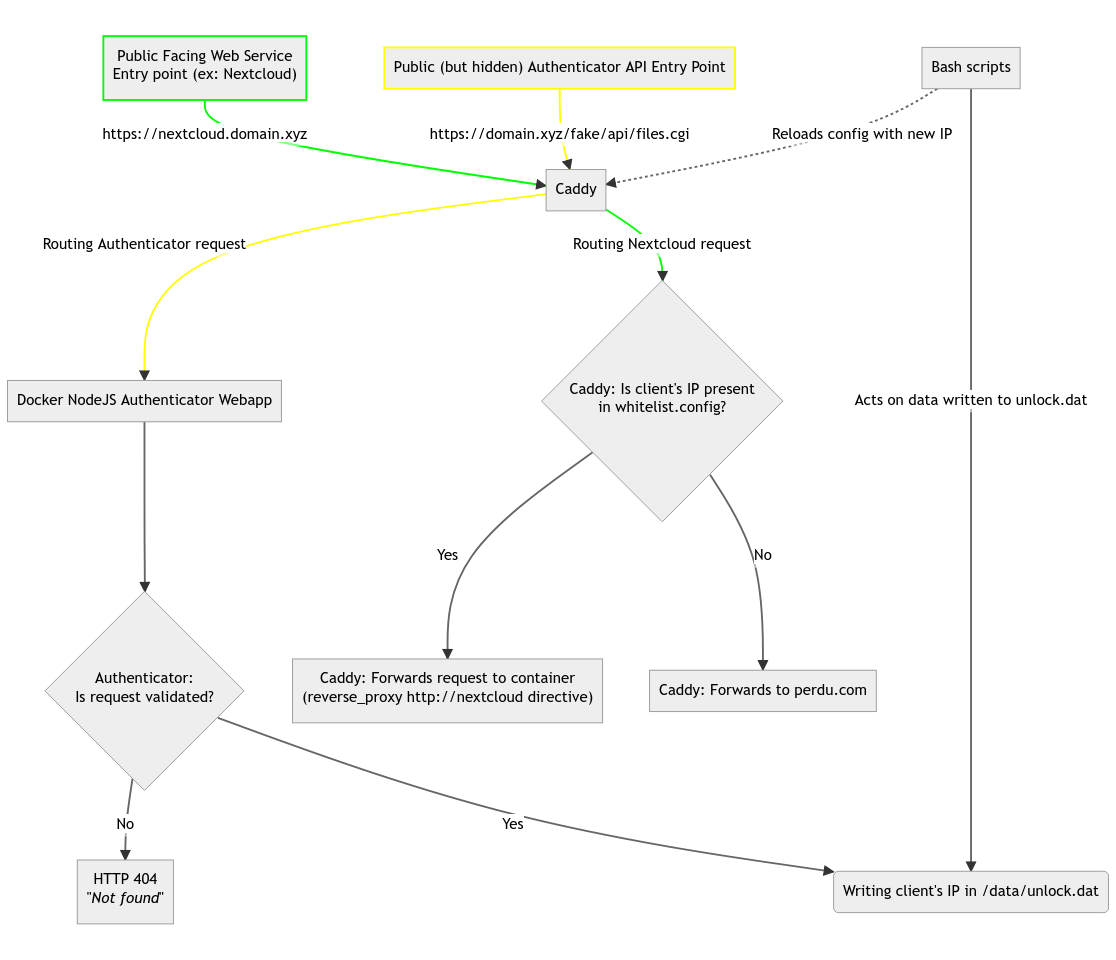
At a glance:
- Let a reverse proxy server (this article uses Caddy as an example as I’ve been using that server everywhere I can) serve as the public facing web server
- This reverse proxy has a special directive for every URL or per-domain config block that I want to protect to either let through already known friendly IPs, or to forward the remaining unknown IPs to another URL out on the internet.
- Up to this point, configuring your reverse proxy will work to allow any known static IPs (like the one I get from work’s internet access) to access my protected services, but for my DSL connection at home or on my cellphone data plan with a dynamic (read: varying) IP, I need to use a custom-made nodejs web server that’s always public but listens to a very specific URL that acts as an “Open Sesame” entry point. Hitting the right URL and the right parameters will trigger this events:
- Regenerate the caddy config to add this request’s IP to the list of allowed hosts to reach private services;
- Warn me on a IM platform of my choice that this system whitelisted a new IP;
- Reload caddy to use the new, altered config with the new IP added;
- Wait 24h before retiring this dynamic IP and do the whole configuration modification / warn / reload caddy loop again.
- The “Open Sesame” custom nodejs can be as odd or as obscure (or not) in it’s URL, headers and parameters. There is also nothing preventing you to use a TOTP code in the request for added security. Sky’s the limit, really!
Caddy - Allowing access for static IPs
For every host or URL that you want to protect, add a line import whitelist.config in it’s configuration block. This will import a file called whitelist.config in the same directory as your Caddyfile by default. Yours can be different, but you have to make sure to change the add-ip.sh script (shown later) to reflect the correct file path.
http://nextcloud.bilange.ca {
        import common-acmecert
        import whitelist.config
        redir https://{host}{uri}
}
https://nextcloud.bilange.ca {
        import common-acmecert
        import safe-headers
        import whitelist.config
        encode gzip
        reverse_proxy http://nextcloud
}
(Note: Configuring Caddy (or any web server for that matter) is beyond the scope of this document, but the general idea applicable to any web server is to have a second, seperate piece of config that you want to import and use for every domain or URL you want to protect, as the second config has the directive to block the bad actors)
Here is my complete whitelist.config file:
@outsiders not remote_ip forwarded 1.1.1.1 2.2.2.2 3.3.3.3
redir @outsiders https://www.perdu.com
This config defines this:
- It sets the
@outsidersvariable as anyone EXCEPT the IP listed on the line (source: caddy docs). I added three random IPs in the code above, but in my private setup, there are static IPs written on the line. I have not thought about what if you don’t need any static IPs permanently listed here, and I suspect caddy will warn about an incomplete line if you don’t provide an IP. As an hypothesis, I guess you could put there a private IP that won’t be ever used in the server’s LAN. For example, if your server sits on 10.10.2.10, put a fake IP on a non-existant LAN subnet like 192.168.164.225. - Tells caddy to redirect members of
@outsiders(so, everybody but a select few) out to a random website; in a corporate environment this could be your main front page for example. (“Perdu” means “lost” in French, and the website says “Lost? Don’t panic, we’ll help you. You’re there . <–”)
Anyone not affected by the redirect is actually a known IP which is fine to let through.
Changes to caddy may be live-reloaded with the command caddy reload --config /path/to/your/Caddyfile.
The extra mile - allowing anybody on demand (advanced)
While the above will work for static or previously known IPs, there is however a missing piece of the puzzle: when you’re on the go on your cellphone, or at home with an ISP that gives you a dynamic (read: always changing) IP, you may want to access your private web services on an remote server (for example a Nextcloud instance you’re afraid to let accessible over the public internet). What I have used in the last year is a variation of the following steps.
I have obviously changed the exact details for security reasons, but this also shows the point that you can use whatever method of authenticating yourself by altering the configuration below to your liking.
NodeJS - “HTTP Knocker” Web Server
(Sidenote: The word Knocker here is a reference to Port Knocking, where you have to connect to a very specific set of ports, in order, to trigger a script that opens up the server for you. )
I use a very simple NodeJS container that does this tasks:
- Accepts incoming HTTP requests for only a very specific HTTP Method and URL (that you should customize for your needs);
- Authenticates the user in a way that should not be possible to figure out from a stranger’s point of view
- A valid HTTP request is then logged to disk, to be picked up by a Bash script running outside the NodeJS container (directly on the host)
Here is how my Caddy server is configured to pass-through requests to that NodeJS container:
# HTTP subdomain knocker
https://obscure.subdomain.bilange.ca/random/path {
        reverse_proxy * {
                to http://nodejs-http-knocker-container:80
        }
}
- While I implemented my solution as a seperate NodeJS container (this gives me the peace of mind of not worry too much about vulnerabilities I created, if any), you don’t really HAVE to. If you’d like, you can just host this NodeJS app directly on the host, making sur that the NodeJS process only accepts connections from localhost on a high port or something. I’ll leave that to you as an exercise.
- Because of my added complexity of bundling that HTTP Listener inside a container, this made me create a Bash script running outside the container responsible of listening for changes in a file (that is BOTH host and container accessible) and regenate my Caddy file. If I had run my NodeJS container straitght on the host server, the trouble of building a seperate Bash script could have been avoided and bundled straight into the NodeJS app, hypothetically.
- Public facing HTTPS is facultative but highly recommended. In my setup and on my clients authenticating for access, I use a combination of HTTPS and a random fake value on EVERY request (literally a random and high number), to prevent replayability . This ensures that my HTTPS stream seems different from the outside (from en encrypted point of view) for every request.
- There is nothing preventing you to use one of your hosted services, say, a Nextcloud instance, and mimick their API to use an API endpoint that looks similar at first glance, but is actually not used by the service. As random suggestions for a Nextcloud instance, you could use, for example:
-
GET /ocs/v1.php/cloud/capability(It’s real endpoint is/ocs/v1.php/cloud/capabilities) -
PROPFIND remote.php/dav/file/user/path/to/folder(It’s real endpoint isfilesplural.)
-
Using a fake but seemingly valid API tactic, we could install our NodeJS listener on this endpoint in the Caddy configuration:
# HTTP service knocker
https://nextcloud.bilange.ca/ocs/v1.php/cloud/capability {
        reverse_proxy * {
                to http://my-http-knocker-container:80
        }
}
Whatever fake API endpoint you use (or you could use your own fake custom path like bilange.ca/api/files.cgi for example), you need to reflect that in BOTH the code of the NodeJS App and in your reverse proxy configuration, both HAS to be identical for requests to be handled correctly by the NodeJS app.
The NodeJS app source code generally looks like this, but may need some fine-tuning on your end. What is listed below is the complete source code. Check the comments scattered throughout the code to understand how it work and how to improve over it. Warning: some lines are longer than the code block, but you should be able to copy/paste and/or scroll to see the longer lines.
data/app.js
This is the main NodeJS application, it’s listening on port 80 because it sits alone in a Docker container in my setup, but if you choose to go the other way straight on the host, you may need to bind to a higher port.
var http = require('http');
var fs = require('fs');
var util = require('util');
var log = fs.createWriteStream('/data/access.log', {flags : 'a'});
var timeOffset = 30; //when using timestamp based authentification, we can tolerate this amount of seconds as a valid offset

// These variables are the response send to any client not passing authentification correctly
// We use HTTP 500 specifically to confuse any attacker
var statusCode = 500; //HTTP Status Code
var statusMessage = 'Internal Server Error'; //HTTP Status Message

function zeroPad(s) { return s < 10 ? '0'+s : ''+s; }
function formatDate(d) { return d.getFullYear()+'-'+zeroPad(d.getMonth()+1)+'-'+zeroPad(d.getDate())+' '+zeroPad(d.getHours())+':'+zeroPad(d.getMinutes())+'.'+zeroPad(d.getSeconds()); }

// Get client IP address from request object
getClientAddress = function (req) { return (req.headers['x-forwarded-for'] || '').split(',')[0] || req.connection.remoteAddress; };

function rejectConnection(ip, res, reason = "") {
        res.statusCode = statusCode;
        res.statusMessage = statusMessage;
        res.write(statusMessage); //response body
        res.end();
        if (reason == "") console.log(ip+": rejected connection");
        else console.log(ip+": rejected connection: "+reason);
        return;
}

http.createServer(function (req, res) {
        if (req.headers.host === undefined || req.headers.host === null) {
                // reject: client never specified the HTTP Host header
                res.statusCode = statusCode;
                res.statusMessage = statusMessage;
                res.end();
                return;
        }

		// Insert your custom API endpoint here, this MUST match your HTTP Reverse proxy server rule.
        if (req.url == "/ocs/v1.php/cloud/capability" && req.method == "GET") {
                var authHeader = req.headers.authorization;

                // client did NOT send a valid user:password in its HTTP headers
                if (authHeader === undefined) { return rejectConnection(getClientAddress(req), res, "headers missing (auth)"); }

                // client did NOT send the time HTTP header, value needs to be the current unix timestamp
                // this acts as encryption garbling and not a real security mesure
                if (req.headers.time === undefined) { return rejectConnection(getClientAddress(req), res, "headers missing (time)"); }

                var auth = new Buffer(authHeader.split(' ')[1], 'base64').toString().split(':');
                var username = auth[0];
                var password = auth[1];

                // This is absolutely not secure, but serves as a quick way to make it work.
                // As a way to improve this, you could use a NodeJS TOTP generator like
                // https://www.npmjs.com/package/totp-generator and use the TOTP code as the valid password.
                // I leave that to you to implement :)
                if(username == 'john' && password =='hunter2') {
                        var requestTime = (new Date()).getTime();
                        var requestedTime = parseInt(req.headers.time, 10);

                        // Timestamp header specified, but unable to parse that as a valid integer
                        if (isNaN(requestedTime)) { return rejectConnection(getClientAddress(req), res, "time missing"); }

                        // Let the client in if the specified timestamp is correct
                        if (Math.abs(requestedTime-requestTime)/1000 < timeOffset) {
                                res.statusCode = 200;
                                res.write("OK"); // server response not verbose on purpose,
                                res.end();       // it's up to the client to know what to do
                                console.log(getClientAddress(req)+" is allowed access");

                                log.write(formatDate(new Date())+' '+getClientAddress(req)+'\n');

								// IP is logged on the filesystem for bash scripts to pick on it later on
                                var access = fs.createWriteStream('/data/unlock.dat', {flags : 'w'});
                                access.write(getClientAddress(req));
                                access.end();

                        } else { // bad timestamp (possible replay attack?)
                                return rejectConnection(getClientAddress(req), res, "timestamp invalid");
                        }
                        return;
                } else {
                        // wrong password
                        return rejectConnection(getClientAddress(req), res, "bad password");
                }
        } else {
	            // Unknown request or wrong HTTP Method
                return rejectConnection(getClientAddress(req), res, "unknown request (bad HTTP method or URL)");
        }
}).listen(80); //the server object listens on port 80
The NodeJS Docker container is setup with this file and directory structure (and every file listed will be printed out below as well):
- Dockerfile
- add-ip.sh
- unlockdat-watcher.sh
- data/app.js (That’s the NodeJS application with the code printed out above)
- data/access.log (Will be created when users are allowed)
- data/unlock.dat (Will be modified when clients authenticates themselves, and will be read immediately by http-knocker-watcher.sh)
Dockerfile
This file is required to build a custom made Docker image from scratch. It is indirectly called by the docker-compose file I use in my setup
FROM alpine:3.7
RUN apk add --no-cache nodejs-current
CMD ["/usr/bin/node","/data/app.js"]
(Part of) docker-compose.yml
Here’s the part responsible of launching an instance of this NodeJS container:
  http-knocker:
    container_name: my-http-knocker
    restart: always
    build:
      context: /path/to/your/http-knocker/docker/container/folder # This should point to the directory where all files mentioned above resides on disk
    image: http-knocker
    networks:
      - caddy
    ports:
      - "80"
    volumes:
      - /path/to/your/http-knocker/docker/container/folder/data/:/data/  # Absolutely important!
However you decide to setup your container, it’s required to create a volume for the /data subfolder in the container. This should be a subfolder of where all the files listed above resides on disk. Mounting /data is vital, as the NodeJS app will write successful authentifications to the file /data/unlock.dat which will be read by the following shell scripts below, which are running outside of the container.
unlockdat-watcher.sh
This script (and add-ip.sh) acts as the bridge between the container’s data/unlock.dat and Caddy: it needs to be running at all times and will act immediately on changes detected in unlock.dat. When changes are detected, it will actually launch an instance of add-ip.sh in the background with the client’s IP as a parameter, read from data/unlock.dat, so it can return immediately in a “waiting” state for the next time NodeJS writes an IP into that file.
There is two scripts in my solution because the other script is responsible to remove the allowed IP 24h later. So in my other script below, execution actually sleeps and blocks for 24h until it is time to remove the allowed IP.
#!/bin/bash
# This script is permanently run on the host server (not in the NodeJS Docker container).
# It watches the file data/unlock.dat, and calls add-ip.sh if there is a valid IP written in that file.
#
# You NEED to have this script launched on your server's startup, as it waits for changes in the unlock.dat file permanently.
# This script requires the inotifywait command present in the OS. In Debian-like distros, install the package inotify-tools.

basedir=/path/to/your/http-knocker/docker/container/folder
rx='([1-9]?[0-9]|1[0-9]{2}|2[0-4][0-9]|25[0-5])'

while true; do
		# This command waits for changes to the file unlock.dat; this command actually blocks until the file is modified.
		# This only happens when a valid, authenticated client logs on and hits the hidden API endpoint.
        inotifywait -e modify $basedir/data/unlock.dat >/dev/null

        ip=`cat $basedir/data/unlock.dat`

        # only acts if this is an IP address validates by regular expression
        if [[ $ip =~ ^$rx\.$rx\.$rx\.$rx$ ]]; then
		        # calls the script that actually adds this IP to the whitelist AND reload caddy
                ( $basedir/add-ip.sh $ip & ) &  # Calling a shell script (or any program) that way ensures it's fully forked
								                # in the background.
                truncate -s 0 $basedir/data/unlock.dat # removes all data from the file
                sleep 1 # i don't want inotifywait to detect the change I made from THIS script :)
        fi
done
add-ip.sh
This Bash script does the heavy work of keeping a list of allowed IPs and remove them from the list as they expire 24h later. It also regenerate the Caddy’s whitelist.config as the IP list changes, and live-reloads Caddy when the config has changed.
#!/bin/bash

# This script is responsible of adding a new IP to the whitelist, while regenerating the
# whitelist.config file and live-reloading caddy with it.

# add-ip.sh will always be called with a valid IPv4 as the first parameter, from unlockdat-watcher.sh.

basedir=/path/to/your/http-knocker/docker/container/folder
ip=$1 # this safe-checking should not be required and is omitted for this blog post

rebuildConfig()
{
        # this function rebuilds whitelist.config with the current list good of known IPs

        caddyconfig=/path/to/whitelist.config
        echo "# generated by unlockdat-watcher.sh, do not modify" > $caddyconfig

		# you may hard-code always whitelisted IPs on this line:
        echo -n "@outsiders not remote_ip forwarded 1.1.1.1 2.2.2.2 " >> $caddyconfig

		# this loop will add an IP (based on the full filename)
		# in the caddy config for every file found under ./ips/
        for singleip in $basedir/ips/*; do
                echo -n "`basename $singleip` " >> $caddyconfig
        done
        echo "" >> $caddyconfig # ends the line of the list of IPs to be whitelisted

		# second line of the config (static): forward non-members of @outsiders elsewhere
        echo "redir @outsiders https://www.perdu.com" >> $caddyconfig

        # live-reload caddy
        docker exec caddy caddy reload --config /etc/caddy/Caddyfile
}

# Main execution:

# adds the IP from the commandline parameter to a directory containing
# all temporarily allowed IPs as a dumb empty file
touch $basedir/ips/$ip

# I personally alert myself that this system added a new IP to the whitelist, just as an
# excess of precaution.
/usr/local/sbin/gotify-notification notification "Web Knocker: New Authenticated IP: $ip"

# Bash function defined above
rebuildConfig

# This script waits 24h before continuing
sleep 24h

# The next command looks for files under the ips subdirectory that are older than a day
# and deletes them
# -mtime +1: older than a day
find $basedir/ips -type f -mtime +1 -delete

# Recreates the caddy whitelist.config file with the temporary IPs removed
rebuildConfig
Conclusion
My recommendation is to protect services that contains sensitive content, like a file manager or a password manager, behind this whitelist tactic presented here. Obviously, this will be impossible to do on services that rely on peer to peer for it to work, like Mastodon or federated Nextcloud instances.
I hope this will be useful to somebody! My goal in publishing that is to give selfhosters a bit of confidence in publishing their web service of choice, without having to fear getting their server or service breached. Also, the more tech-savvy people self-hosts, the less people will depend on third-party which they have less control on.